Urban Guide to DIY Seed Starting: Creating a Home Seed Bank for Sustainable Gardening Practices
As urban spaces become greener, many city dwellers want to garden sustainably. This guide shows you how to practice DIY seed starting and create a home seed bank. These methods help reduce waste and support eco-friendly gardening. You will learn the benefits of seed saving techniques, composting, and using natural pest control to make your gardening efforts more sustainable. For more tips on urban gardening, consider checking out the frugal urban dweller guide.
The Basics of DIY Seed Starting for Urban Gardeners
Key Takeaway: Seed starting is a simple way to grow your plants while being kind to the earth.
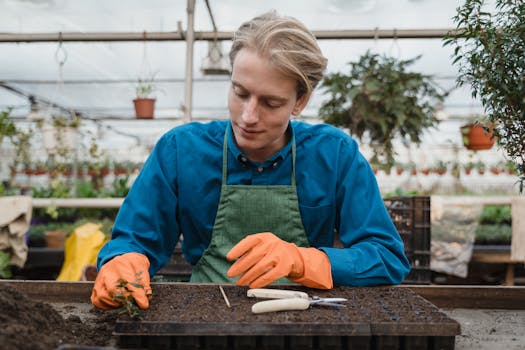
DIY seed starting is a great skill for urban gardeners. It means growing your plants from seeds instead of buying young plants. This practice is not only cost-effective but also fun and rewarding! You can grow a wide variety of vegetables, herbs, and flowers right from your home. Plus, starting with seeds helps reduce waste since you make fewer trips to the garden center and can grow plants that are perfect for your space.
To begin, you need some basic materials. Here’s a list to get you started:
- Seeds: Choose varieties that grow well in your climate. Look for labels that say “good for containers” or “compact.”
- Containers: Use recycled items like yogurt cups, egg cartons, or small pots. Just make sure they have holes at the bottom for drainage.
- Potting Soil: Look for organic potting mixes that contain ingredients like peat moss and vermiculite. These help retain moisture and provide nutrients.
- Light Source: If you don’t have a sunny window, consider using grow lights. They can help your seeds grow strong and healthy.
Starting seeds allows you to enjoy fresh produce right from your home. As you nurture your seedlings, you also learn more about plants and their needs. This knowledge will benefit your gardening journey for many years. (You might even impress your friends with your green thumb!)

How to Create a Home Seed Bank: A Step-by-Step Approach
Key Takeaway: Creating a seed bank at home helps you save money, time, and the environment.
Building a seed bank at home is easier than you might think. It’s a way to collect and store seeds from your plants, so you can grow them again next season. Here’s how to do it:
Collect Seeds: After your plants have flowered and produced seeds, collect them. For example, let your tomatoes ripen fully before harvesting seeds. Make sure to choose the healthiest, largest seeds for the best results.
Clean and Dry: Clean the seeds by removing any pulp or debris. Lay them out on a paper towel and allow them to dry completely for a few days. This step is vital because moisture can lead to mold when storing seeds.
Store Seeds: Use small glass jars, envelopes, or plastic containers. Label each container with the plant type and date. Don’t forget to include any special notes, like whether the seeds are heirlooms or hybrids.
Choose a Cool, Dark Place: Store your seeds in a cool, dark place to prolong their lifespan. A pantry or cupboard works well. Avoid places with heat and humidity, like near the stove or in the bathroom.
This process of seed saving not only helps you save money but also promotes biodiversity. By selecting seeds from your own plants, you can develop varieties that adapt well to your local conditions. Plus, it’s a great conversation starter with fellow gardeners! (Just wait until they see your stash of heirloom tomato seeds.)
Space Solutions: If you live in a small apartment, use vertical storage solutions like shelves or drawer organizers to keep your seeds organized without taking up too much space.

Sustainable Gardening Practices: Beyond Seed Starting
Key Takeaway: Eco-friendly pest control and composting can improve your garden’s health and reduce waste.
Once you have your seeds started and stored, it’s time to think about other sustainable practices. Eco-friendly pest control and composting are essential for a thriving urban garden.
Eco-Friendly Pest Control
Pests can be a problem, but there are many natural ways to control them. Here are some effective methods:
- Companion Planting: Some plants naturally repel pests when grown together. For example, planting marigolds with tomatoes can deter harmful insects.
- Insecticidal Soap: You can make a simple soap solution by mixing water with a few drops of dish soap. Spray this on affected plants to help control pests like aphids.
- Neem Oil: This natural oil is effective against many pests. Mix it with water and spray it on plants to keep bugs at bay. These methods are safe for you and the environment. Plus, they help you avoid chemical pesticides that can harm beneficial insects.
Composting Tips
Composting is another excellent practice for urban gardeners. It reduces waste and provides your garden with rich nutrients. Here’s how to start composting at home:
Choose a Container: You can buy a compost bin or make one from a plastic container with holes for aeration. If space is tight, even a small bucket can work.
Add Kitchen Scraps: Include fruit and vegetable scraps, coffee grounds, and eggshells. Avoid meat, dairy, and oils, as these can attract pests.
Layer Your Materials: Alternate between green materials (like vegetable scraps) and brown materials (like dry leaves or cardboard). This helps maintain a balanced compost pile.
Turn the Pile: Every few weeks, turn your compost to aerate it. This process speeds up decomposition and reduces odors.
Harvest Your Compost: In a few months, you’ll have dark, crumbly compost that you can mix into your garden soil. It enriches the soil and helps your plants grow strong.
Using compost not only reduces waste but also improves soil structure, moisture retention, and nutrient availability. It’s like giving your plants a nutritious meal! (Just think of it as the ultimate “superfood” for your garden.)

Practical Tips for a Thriving Urban Garden
Key Takeaway: Small spaces can still produce big results with the right techniques.
Urban gardening can be challenging due to limited space, but with creativity, you can create a thriving garden. Here are some practical tips:
Vertical Gardening: Use wall-mounted planters, trellises, or hanging baskets to maximize space. This method allows you to grow more plants without taking up valuable ground space.
Container Gardening: Consider using containers for growing herbs and vegetables. They can be placed on balconies, patios, or even windowsills. Just make sure your containers have good drainage.
Community Gardening: Join a local community garden. These spaces often provide tools, soil, and a supportive community. It’s a great way to learn from others and share your gardening experiences. Engaging in community gardening initiatives can enhance your gardening journey.
Participate in Local Seed Swaps: Look for events in your area where gardeners exchange seeds. This can help you diversify your plants and connect with fellow gardening enthusiasts.
These strategies help you make the most of your urban space while promoting sustainable practices. Remember, every little effort counts! (Think of it as making your small footprint a little greener one seed at a time.)
By incorporating these practices into your gardening routine, you not only enhance your own gardening experience but also contribute to a healthier environment. Your urban garden can become a lush oasis that benefits both you and your community. Start your journey with DIY seed starting today, and watch your garden flourish!
FAQs
Q: How can I ensure the seeds I start at home are viable and produce healthy plants, especially if I plan to save them for a seed bank?
A: To ensure the seeds you start at home are viable and produce healthy plants, select seeds from vigorous, disease-free plants and allow them to fully mature on the parent plant before harvesting. Maintain optimal drying conditions and store seeds properly in a cool, dry environment to enhance their viability for future planting or seed banking.
Q: What are the best ways to create optimal growing conditions indoors for various types of seeds, and how does this impact future seed saving?
A: To create optimal growing conditions indoors for various types of seeds, ensure adequate light sources—preferably LED grow lights—maintain consistent temperatures between 65-80°F, and manage humidity levels. These conditions can significantly enhance seed germination and plant health, which in turn improves the quality and viability of seeds saved for future planting.
Q: How do I properly store seeds after they’ve matured and been harvested, so they remain viable for my home seed bank?
A: To properly store seeds after they’ve matured and been harvested, ensure they are fully dry and place them in labeled, moisture-proof containers such as glass jars or airtight plastic boxes. Store the containers in a cool, dark place, ideally at temperatures between 3-5°C (37-41°F) for long-term viability, and include a desiccant like silica gel to absorb any remaining moisture.
Q: What are some common pitfalls in DIY seed starting that could affect my ability to successfully harvest and store seeds for future planting?
A: Common pitfalls in DIY seed starting include improper watering, which can lead to overwatering or underwatering, and not following the recommended planting depths and spacing for seeds. Additionally, using the wrong soil medium or failing to provide adequate light and warmth can hinder seed germination and affect the overall health of the plants, ultimately impacting your ability to successfully harvest and store seeds for future planting.