Storing Seeds Properly: Uncommon Long-Term Preservation Techniques for Eco-Friendly Urban Gardeners
Urban gardening offers a great way to grow fresh food while being kind to the planet. Storing seeds properly is key for eco-friendly gardeners who want to save money and reduce waste. This guide shows how to preserve seeds for future planting, helping you create a sustainable cycle in your garden. We will explore simple methods, tips, and techniques that make seed saving easy and effective for everyone.
Understanding the Basics of Seed Preservation
Key Takeaway: Properly drying and storing seeds is crucial for preventing spoilage and ensuring they are ready for planting.
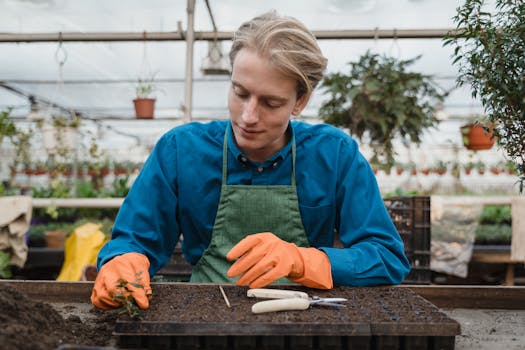
Many urban gardeners face a common problem: their saved seeds spoil before they can be used. Spoilage can happen due to mold, moisture, or pests. To avoid this, it is essential to dry seeds correctly before putting them away for storage.
First, start with the right conditions. Seeds need to be dry, cool, and pest-free. For small seeds, like those from herbs, lay them out on a clean surface, such as a window screen or a plate, for a few days. Check them frequently. When they feel crispy, they are ready for storage. For larger seeds, like beans or corn, use a dehydrator or a fan. Be cautious with heat; anything above 100°F can damage the seeds. While sunlight doesn’t harm seeds, it can create temperature swings, which is not ideal.
Airflow is vital when drying seeds. Ideally, seeds should be dried in a cool area with dry air circulating around them. Once the seeds feel dry to the touch, it’s time to store them.

Next, consider where to keep your seeds. If you want to store seeds for a long time, you can use your freezer. Just be sure the seeds are completely dry before freezing. Damp seeds will not survive freezing. To keep bugs away, freeze the seeds for three days after drying. This method is particularly effective for larger seeds. When you take them out, let them warm to room temperature before opening the container.
Why this Matters: Following these steps helps ensure that your seeds remain viable for planting when you need them. A little care in drying and storing can lead to a bountiful harvest in your urban garden.
Uncommon Techniques for Preserving Seeds Long-Term
Key Takeaway: Think outside the box with innovative seed storage methods to enhance longevity.
Many urban gardeners are familiar with traditional seed storage methods, but they often don’t provide the longevity that some gardeners seek. If you’re looking for ways to keep your seeds viable for years, consider some uncommon techniques that can enhance seed preservation.
One effective method is vacuum sealing. This technique removes air from the storage bag, which helps prevent the seeds from degrading. You can use a vacuum sealer or even a straw to suck out the air from a zip-lock bag. This method is especially useful for long-term storage.
Another innovative method is using silica gel desiccants. These small packets absorb moisture and keep the seeds dry. Place a few packets in with your seeds before sealing the container. This is particularly helpful for those seeds that are sensitive to moisture.
These methods can significantly extend the shelf life of your seeds. In fact, seeds stored with silica gel can remain viable for several years longer than those stored in traditional ways.

Data Point: Studies show that seeds stored in dry, low-oxygen environments can retain their viability for over 10 years. In contrast, seeds stored in humid conditions may lose germination rates significantly within just a few years.
By exploring these methods, urban gardeners can have a greater chance of success in their planting efforts. Think of your seed storage as a mini time capsule for your garden!
When to Plant Seeds Indoors for Optimal Growth
Key Takeaway: Timing is everything; knowing when to start your seeds indoors can lead to a thriving garden.
Urban gardeners often miss the optimal planting window, which can affect their garden’s success. Knowing when to plant seeds indoors is essential for getting a jump on the growing season. For more detailed guidance, check out our seed saving tips to ensure your seeds are ready for planting.
Additionally, exploring top gardening seed options can help you select the best varieties for your urban garden. Typically, most seeds benefit from starting indoors about 6 to 8 weeks before the last frost date in your area. This timing allows plants to grow strong enough to handle the transition to outdoor life. For example, if you live in a region where the last frost is expected around mid-May, you should start your seeds indoors by late March to early April.
But how do you know when to plant? Check local gardening guides or use online tools that can provide specific dates based on your zip code. You can also look for urban gardening resources that share the best practices for your area.
Why this Matters: Planning ahead means you can maximize your growing season without wasting seeds. It also aligns with eco-friendly practices by encouraging efficient use of resources.

Remember, not all seeds are the same. Some require specific conditions, so check each type’s requirements. For instance, tomatoes thrive when started indoors, while some leafy greens might prefer direct sowing in the garden. By tailoring your planting schedule, you set your garden up for success.
Actionable Tips/Examples: From Theory to Practice
Practical Advice: Start building your own DIY seed bank using recycled materials around your home. You can use empty jars, small boxes, or any containers that can keep seeds dry and pest-free.
Here’s a simple step-by-step guide to create your seed bank:
- Collect your seeds: Gather seeds from your plants or buy them from a reputable source.
- Dry them properly: Follow the drying steps mentioned earlier to ensure they are free from moisture.
- Label your containers: Use masking tape and a permanent marker to label each container with the seed type and date collected.
- Store your containers: Keep them in a cool, dark place, like a cupboard or pantry, away from direct sunlight.
Data: According to experts, gardeners who save seeds tend to have higher success rates with their crops, especially when they use seeds adapted to their local environment.
Case Study: Meet Sarah, an urban gardener in Chicago who started her seed-saving journey last year. She faced challenges with her first batch, as many seeds spoiled due to improper storage. After learning how to dry and store seeds properly, she successfully grew a variety of vegetables this season using seeds she had saved from last year. Sarah says, “It feels so rewarding to see my plants thrive knowing I took the time to store my seeds properly.”
By implementing these techniques, you can join the ranks of successful urban gardeners while contributing to a more sustainable gardening practice.
With these clear, actionable steps, you are now equipped to take control of your gardening efforts. Think about how much more enjoyable your gardening experience can be when you know how to store seeds properly. Remember, a little preparation goes a long way in ensuring a thriving urban garden!
FAQs
Q: How can I ensure my saved seeds remain viable for several years, and are there any uncommon storage techniques I should consider?
A: To ensure your saved seeds remain viable for several years, store them in a cool, dry place, ideally in airtight containers with moisture-absorbing materials like silica gel. Uncommon techniques include using a dehydrator for drying seeds and freezing completely dry seeds in a sub-zero freezer, which can extend their viability to 50 years or more.
Q: What are the best methods for drying seeds to prevent mold and decay before storage, especially if I have limited space or equipment?
A: To dry seeds effectively and prevent mold and decay, ensure they are fully dry by spreading them out in a cool, well-ventilated area for a few days. For limited space or equipment, use old window screens or plates for drying, and store seeds in moisture-proof containers like glass jars or Ziploc bags labeled with the variety and date.
Q: Can you explain the timing and conditions for starting seeds indoors after long-term storage to maximize germination success?
A: To maximize germination success when starting seeds indoors after long-term storage, ensure the seeds are fully dry and mature before planting. Begin the germination process by maintaining a warm environment, as most seeds benefit from temperatures around 70-75°F (21-24°C), and provide consistent moisture without waterlogging.
Q: Are there specific environmental factors I should monitor in my storage space to prevent seed deterioration over time?
A: To prevent seed deterioration over time, monitor the temperature and humidity levels in your storage space. Ideally, seeds should be stored in a cool (around 21°C or 70°F) and dry environment to maintain their viability, while avoiding moisture that can lead to fungal growth.